Cloud Native Monitoring Notes
Cloud Native Monitoring
Observability 是指一种 从系统外部输出能够理解到系统的程度 的 系统特性。
比如我们可以从系统的cpu占用,内存使用量等来观察计算机。
Analysis 指的是分析这些可观测数据并进行理解。
为了确保系统不中断,需要对系统的各个方面进行观测和分析。
Observability和Analysis工具涵盖了logging, monitoring, tracing, 和 chaos engineering。
Monitoring
监控是指对系统进行检测以收集、汇总和分析日志和指标,以提高我们对其行为的理解。
而一个好的监控能够让操作人员快速响应异常,甚至能够自动的进行处理,同时也能够监控系统的健康程度,甚至系统的任何变动。
同时,监控是一个高效系统重要的组成部分。
| Buzzwords | CNCF Projects |
|---|---|
| Monitoring Time series Alerting Metrics | Prometheus (graduated) Cortex (incubating) Thanos (incubating) Fonio (sandbox) Kuberhealthy (sandbox) OpenMetrics (sandbox) Pixie (sandbox) Skooner (sandbox) Trickster (sandbox) |
Prometheus
Overview
Architecture: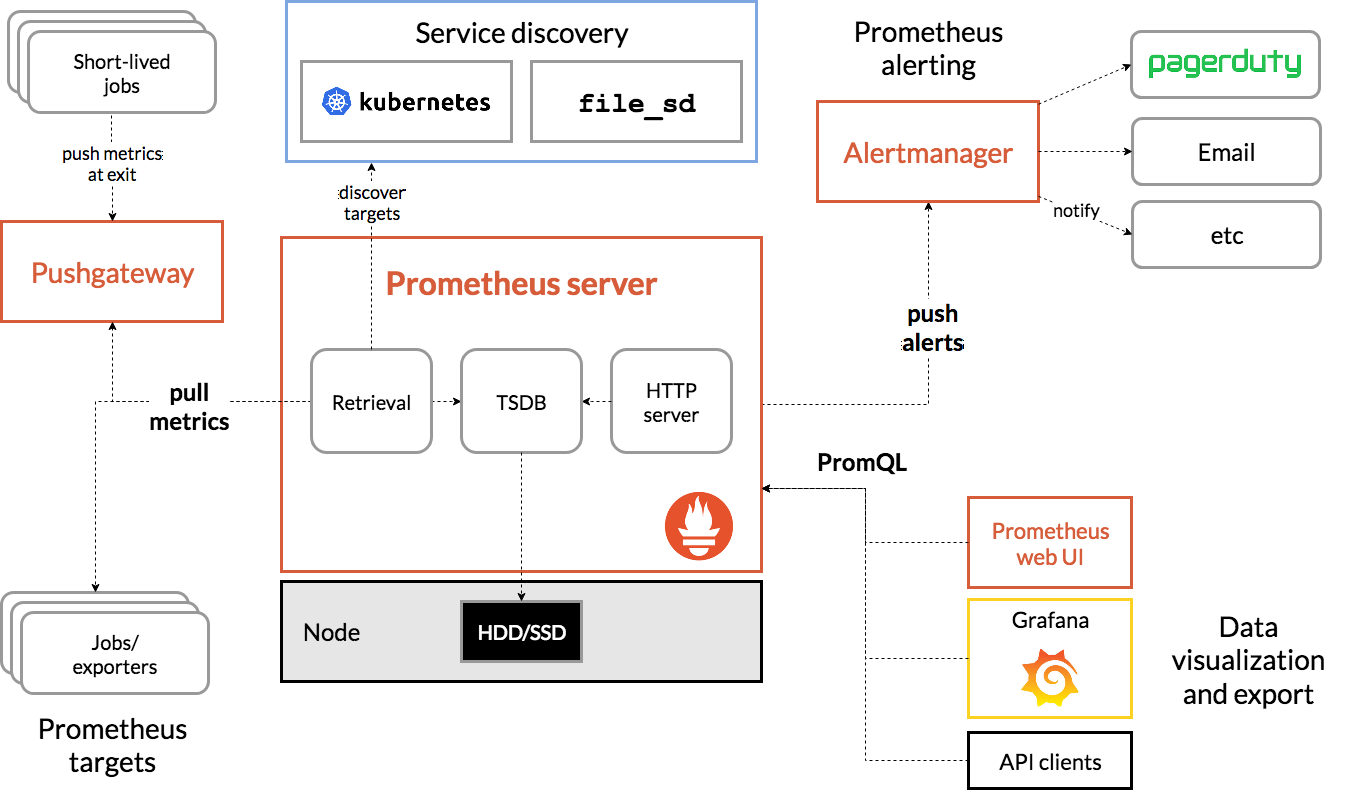
组件:
- 抓取,读取时序数据的后端服务;
- 客户端;
- 支持短生命周期任务的
Pushgateway; - 用于服务导出数据的
Exporter; - 告警系统;
- 多种支持工具;
Metric DataModel
Metric Definition:
1 | |
Text Data Format
1 | |
文本协议基于 行,忽略空行,使用 \n 分割,最后一行必须是换行符。
# 是注释行,但是如果后面是 HELP 和 TYPE:
HELP那么后面需要一个 metric 名称,其他则是相关的注释,同时一个 metric 只能有一个HELP行;TYPE后面需要一个 metric 名称,紧接着是 metric 类型,类型是非必填,如果不填写则默认为untyped;
1 | |
Metric Types
Counter
是一个逐渐累加的metric数据,比如已完成请求数量等等,不能使用counter来表示一个可以减少的数据,比如当前线程数量。
Gauge
是一个可任意增减的metric数据,且仅能是一个数字,比如内存使用量、温度等等。
Histogram
Histogram包含了一个时间段内以同一个前缀命名的多个时序数据:
<basename>_bucket{le="<upper inclusive bound>"}观察到的累计计数,可以理解成小于某个值的统计数量;<basename>_sum观察值总和;<basename>_count观察到的事件总数;
Summary
Summary包含一个时间段内以同一个前缀命名的多个时序数据:
<basename>{quantile="<p>"}q-quantiles (0 ≤ q ≤ 1)观察到事件的q分位数 ;<basename>_sum观察值总和;<basename>_count观察到的事件总数;
1 | |
Histogram 和 Summary 差异:
- 都包含了sum和count指标;
- Summary直接存储分位值,而Histogram需要进行计算;
JOBS AND INSTANCES
instance 是指一个可以抓取数据的 endpoint,通常也是对应一个进程。
具有相同目的的 instance 称为一个 job。
- job: api-server
- instance 1: 1.2.3.4:5670
- instance 2: 1.2.3.4:5671
- instance 3: 5.6.7.8:5670
- instance 4: 5.6.7.8:5671
ServiceMonitor & PodMonitor
prometheus通过 ServiceMonitor 监控 service,通过 PodMonitor 来监控 pod。
默认配置的是可以获取集群中所有的monitor资源,前提是配置好权限,如果需要限制prometheus监控的monitor范围,
可以在 prometheus-prometheus.yaml
中进行配置:
1 | |
Deploy
kubernetes 部署方式支持 operator 和 kube-prometheus,
这里使用 kube-prometheus 来进行部署。
1 | |
需要注意的是上面的配置文件创建在 monitoring 命名空间下,同时为了支持跨 ns 的监控需要修改服务端的权限配置,
prometheus-clusterRole.yaml :
1 | |
部署成功后默认配置了下面的 service :
1 | |
需要关注的是下面几个 service :
alertmanager-main;grafana;node-exporterk8s集群节点exporter(每个节点都部署了一个);prometheus-k8s;
先将所有的ui服务通过ingress暴露出来:
1 | |
Querying
PromQL数据类型:
- Instant Vector 一组时间序列,每个时间序列包含一个样本,所有时间序列都共享相同的时间戳;
- Range Vector 一组时间序列,包含每个时间序列随时间变化的数据点范围
- Scalar 简单的数字浮点值
- String 字符串,尚未使用
字面量:
"'`都可以用来声明字符串;23-2.433.4e-90x8f-InfNaN浮点字面量;
选择器:
- 瞬时向量选择器
1
node_cpu_seconds_total{instance="master-1-145", cpu="1"}- 运算符支持
=!==~!~,后面两种是正则表达式; - 同时支持
__name__来筛选metric;1
2# 筛选所有test开头的metric
{__name__=~"test.*"}
- 运算符支持
- 范围向量选择器,
[]来声明时间范围,选择声明范围内的数据:- ms - milliseconds
- s - seconds
- m - minutes
- h - hours
- d - days - assuming a day has always 24h
- w - weeks - assuming a week has always 7d
- y - years - assuming a year has always 365d
1
2# 筛选master-145上1m10s内cpu的使用时间
node_cpu_seconds_total{instance="master-1-145"}[1m10s] offset修饰符,将选择器中当前时间进行偏移,必须紧跟在选择器之后;1
2
3
4# 如果当前时间是 21:00 那么下面查询的就是 20:00 之前的数据
node_cpu_seconds_total{instance="master-1-145"} offset 1h
# 不合法
sum(node_cpu_seconds_total{instance="master-1-145"}) offset 1m@修饰符,用来选择某个时间戳的数据,也需要紧跟在选择器之后;1
2
3node_cpu_seconds_total{instance="master-1-145"} @ 1609746000
# 不合法
sum(node_cpu_seconds_total{instance="master-1-145"}) @ 1609746000
Operators
- 向量匹配,
ignoring可以在匹配时忽略指定标签,而on可以指定匹配的标签;1
2
3
4
5
6
7
8
9method_code:http_errors:rate5m{method="get", code="500"} 24
method_code:http_errors:rate5m{method="get", code="404"} 30
method_code:http_errors:rate5m{method="put", code="501"} 3
method_code:http_errors:rate5m{method="post", code="500"} 6
method_code:http_errors:rate5m{method="post", code="404"} 21
method:http_requests:rate5m{method="get"} 600
method:http_requests:rate5m{method="del"} 34
method:http_requests:rate5m{method="post"} 120- 一对一匹配,如果有相同的标签集合和值,那么他们就是匹配的;
1
2
3
4
5method_code:http_errors:rate5m{code="500"} / ignoring(code) method:http_requests:rate5m
# 计算 500 请求比例
# 由于 method 为 put 和 del 的样本找不到匹配项,因此不会出现在结果当中。
{method="get"} 0.04 // 24 / 600
{method="post"} 0.05 // 6 / 120- 一对多/多对一匹配,一侧的元素可以与另一侧的多个元素匹配上,可以使用
groupe_leftgroup_right来控制以哪边为基准返回结果。
1
2
3
4
5
6
7
8method_code:http_errors:rate5m / ignoring(code) group_left method:http_requests:rate5m
# 左边包含2个标签,右边包含1个标签,无法匹配
# 忽略 code 标签则能够进行匹配
# 这个时候左边是多的一边,group_left 使用左边为基准返回
{method="get", code="500"} 0.04 // 24 / 600
{method="get", code="404"} 0.05 // 30 / 600
{method="post", code="500"} 0.05 // 6 / 120
{method="post", code="404"} 0.175 // 21 / 120 - 算数运算符,
+-*/%^,算数计算只能用于标量/标量,瞬时向量/标量,瞬时向量/瞬时向量;- 标量/标量
- 瞬时向量/标量:向量每个值都和标量作运算
- 瞬时向量/瞬时向量
- 比较运算符,
==!=<>>=<=; - 逻辑运算符,
andorunless,只用于瞬时向量;v1 and v2返回v1中完全匹配v2的元素集合,交集v1 or v2返回v1和v2中没有与v1匹配上的元素集合,并集v1 unless v2返回v1中没有与v2匹配到的元素集合,差集
- 聚合运算;
- sum
- min
- max
- avg
- group (all values in the resulting vector are 1)
- stddev 标准差
- stdvar 方差
- count 计数
- count_values 统计出现的次数
1
count_values("goversion", node_exporter_build_info) - bottomk 最小k个
- topk 最大k个
- quantile q分位数
withoutby,可以理解成不按照xx分组,按照xx分组:
1
2
3sum without (job) (go_goroutines)
sum by (instance, job) (go_goroutines)
sum by (job) (go_goroutines)
运算符优先级:
- ^
- *, /, %, atan2
- +, -
- ==, !=, <=, <, >=, >
- and, unless
- or
Functions
Counter指标增长率
increase(v range-vector)计算范围向量内的增长量;rate(v range-vector)计算范围向量内每秒增长率。应该只用于Counters;irate(v range-vector)计算范围向量内每秒瞬时增长率,使用的是范围向量最后2个样本数据进行计算;
1 | |
increase() rate() 更偏向于平均增长率,而 irate() 是瞬时增长率,各自适合的场景不一样。
Gauge指标
predict_linear(v range-vector, t scalar)预测向量v未来t秒内数据,使用的是 简单线性回归
1 | |
Histogram指标分位数
histogram_quantile(φ scalar, b instant-vector)计算瞬时向量b的φ分位数
1 | |
聚合函数
<aggregation>_over_time():
avg_over_time(range-vector): 平均值min_over_time(range-vector): 最小值max_over_time(range-vector): 最大值sum_over_time(range-vector): 求和count_over_time(range-vector): 计数quantile_over_time(scalar, range-vector): φ分位数stddev_over_time(range-vector): 总标准差stdvar_over_time(range-vector): 总标准方差last_over_time(range-vector): 最近一个采样点数据present_over_time(range-vector): 范围内值为1的时间序列
Exporters
官方支持多种硬件、数据库、消息系统、存储等等的支持,可查看官方 支持列表 。
exporter 用于导出 metric 数据,prometheus 服务来拉取。
Node Exporter
上面提到的 kube-prometheus 部署方式已经默认在集群内部部署了集群节点个数的 node-exporter。
配置文件:
1 | |
监控集群外虚拟机
node exporter 也支持安装包部署,部署成功默认在 9100 端口暴露 metric 数据。
1 | |
配置 prometheus :
1 | |
可以在 service-discovery 进行查看。
JMX Exporter
JMX Exporter 是一个基于 JVM 应用的一个 exporter,
通过javaagent的方式来进行监控,同时需要配置目标应用的jmx:
1 | |
配置agent:
1 | |
exporter配置:
1 | |
配置 ServiceMonitor :
1 | |
How To Debug ServiceMonitor ?

- 检查servicemonitor标签是否成功被Prometheus成功筛选到;
- 检查service的标签是否成功被servicemonitor标签筛选到;
- 检查Prometheus对目标service是否有权限;
- 目标service是否能够正常访问到pod,endpoint是否工作正常;
ServiceMonitor 是否被 Prometheus 筛选到?
查看 配置 中是否有你配置的 job。
Push Metrics
Pushgateway 允许临时和批量任务向prometheus推送 metric 数据。
When to use pushgateway
- 捕获服务级别的批量任务处理结果,比如获取批量删除一大批的用户的结果;
使用 Pushgateway 的缺陷:
- 容易单点故障,可能会成为瓶颈;
- 没有Prometheus示例健康检查;
- 永远不会删除收到的数据,一直暴露给 Prometheus ,除非手动调用api删除。而正常的拉方式当实例消失的时候会自动删除 metric数据;
备选方案
如果是防火墙或者是NAT导致prometheus无法拉取数据,可以使用 PushProx 让 Prometheus穿透NAT或者防火墙,正常的拉取数据。
Deploy Pushgateway & Push metrics
1 | |
大部分exporters都不支持pushgateway,所以需要自己push metric数据。
Pushgateway 支持类似 restful 的metric api,同时也支持admin api。
push一个metric数据(注意所有的换行都是 \n ,结尾也需要一个 \n 可以参考官方的客户端数据格式说明:
Prometheus Client Data Exposition Format ):
1 | |
查询metric:
1 | |
Pushgateway在 /metrics 暴露了所有的metrics数据,所以metric定义一定不能出现冲突,比如相同名称的metric必须有相同的类型和标签,如果冲突了push数据的时候会返回400。
DataStorage
Prometheus支持本地存储和远程存储系统。
容器中默认的数据存储结构:
1 | |
- 数据按照2h分为一组(block);
chunks文件夹里存储的是实际时序数据,默认512m为一个文件进行存储(segment);- 通过api删除的数据存储在
tombstones; - metadata;
- index索引文件,索引的是chunks文件夹里metric名称和标签;
- 当前采集到的数据是在内存中,并未完全持久化到文件,使用
WAL(wirte-ahead log) 加密存储在 wal 文件夹中,即使服务崩溃或者重启也能恢复内存中的数据;- wal 中 128m 为一个文件,并且尚未经过压缩,
存储配置
- 数据保留时间,operator配置在
Prometheus.spec.retention下,默认24h; - block占用空间大小,operator配置在
Prometheus.spec.retentionSize下; - wal压缩,operator配置在
Prometheus.spec.walCompression下,稍微占用cpu;
如果保留时间和大小同时配置了,哪个先触发就先使用哪个,过期的Block清理发生在后台。同时,Block只有在完全过期了才会被移除。
Prometheus每个数据平均占用空间为 1-2 bytes,可以用下面的公式来粗略计算存储占用:
1 | |
数据抓取频率可以在servicemonitor中进行配置:ServiceMonitor.spec.endpoints.interval。
If your local storage becomes corrupted for whatever reason, the best strategy to address the problem is to shut down Prometheus then remove the entire storage directory. You can also try removing individual block directories, or the WAL directory to resolve the problem. Note that this means losing approximately two hours data per block directory. Again, Prometheus’s local storage is not intended to be durable long-term storage; external solutions offer extended retention and data durability.
1 | |
Pushgateway Storage
Pushgateway默认不持久化数据,可以使用 --persistence.file 来配置持久化的文件。
Remote Storage
- remote write,配置位于
Prometheus.spec.remoteRead - remote read,配置位于
Prometheus.spec.remoteRead- 远程读取只读取了原始数据和标签,所有的操作还是在Prometheus服务器进行的。
- receive from other Prometheus server,内置receiver通过
--enable-feature=remote-write-receiver来开启,路径是:/api/v1/write
AlertManager
配置告警和通知流程:
- 配置和部署 Alertmanager;
- Configure Prometheus to talk to the Alertmanager 在Prometheus中配置 Alertmanager;
- Prometheus中配置规则;
1 | |
Alertmanager配置包含3部分:
- 抑制(Inhibition)规则:在与另一组匹配器匹配的告警存在的情况下使另一组匹配器告警规则失效的规则,两组匹配器必须要有一组相同的标签;
- 通知接收者(receivers)配置;
- 通知路由(route)配置;
receivers支持多种通知方式,email、webhook、wechat等等。
Alertmanager通过 Alertmanager.spec.alertmanagerConfigNamespaceSelector Alertmanager.spec.alertmanagerConfigSelector 来筛选配置。
1 | |
配置Alertmanager:
1 | |
Prometheus 通过 Prometheus.spec.alerting 来配置alertmanager,通过 Prometheus.spec.ruleNamespaceSelector 和 Prometheus.spec.ruleSelector 来配置rule。
Prometheus Rules
Prometheus 包含两种规则,一种是 RecordingRules, 一种是 AlertingRules。
RecordingRules
记录规则提供了 提前计算经常需要用的数据 或者 计算量大 的表达式,并且把计算结果保存到新的时序数据中,常见的就是一些复杂的监控面板数据。
AlertingRules
通过Prome表达式来定义报警条件,同时发送通知。
PrometheusRule.spec.groups.rules:
| Field | Description | Scheme | Required | For |
|---|---|---|---|---|
| record | record rules metric name | string | false | Recording |
| alert | alerting rules name | string | false | Alerting |
| expr | 表达式 | intstr.IntOrString | true | Both |
| for | 触发表达式后告警前等待时间 | string | false | Alerting |
| labels | 标签,覆盖方式添加到metric或者alert | map[string]string | false | Both |
| annotations | 添加到alert | map[string]string | false | Alerting |
Templates
告警中使用的模板基于 Go templating。
1 | |
Security
Exporters & Pushgateway
官方exporters和pushgateway支持tls和basic authentication,可以通过启动参数指定配置 --web.config.file="web-config.yml":
1 | |
同时在servicemonitor中 servicemonitor.spec.endpoints.tlsConfig 配置抓取的tls信息,servicemonitor.spec.endpoints.basicAuth 配置basic authentication。
API Security
管理相关的API旨在使用简单的cURL工具访问,所以并没有做CSRF保护。在向外部不可信用户暴露的时候可以使用反向代理来避免CSRF,
对一些不信任的输入进行进行转义。
Pushgateway
由于一般都开启了 honor_labels ,所以能够访问到Pushgateway的用户都能创建任意的时间序列。
如果开启了 --web.enable-admin-api 则可以通过admin api操作任意的数据。
Best Practices
Naming
指标命名:
- 符合模型 定义
- 有一个单词前缀,这个单词可以是应用名称、ns、也可以是某一类通用标准指标,比如:
prometheus_api_remote_read_queriesprocess_cpu_seconds_totalhttp_request_duration_seconds - 必须有一个复数单位作为后缀,或者是 total 后缀作为计数:
http_request_duration_secondsnode_memory_usage_byteshttp_requests_totalfoobar_build_info - 应该代表在所有标签维度上测量的相同逻辑事物
使用标签来区分被观测事物的特征:
node_cpu_seconds_total区分不同状态:idle,iowait,irq,nice,softirq,steal,system,userhttp_request_duration_milliseconds区分不同的状态码:200,302等- 不能使用标签来存储无限制的值集合,比如用户id,邮箱等等
基础单位:
| Family | Base unit | Remark |
|---|---|---|
| Time | seconds | |
| Temperature | celsius | celsius is preferred over kelvin for practical reasons. kelvin is acceptable as a base unit in special cases like color temperature or where temperature has to be absolute. |
| Length | meters | |
| Bytes | bytes | |
| Bits | bytes | To avoid confusion combining different metrics, always use bytes, even where bits appear more common. |
| Percent | ratio | Values are 0–1 (rather than 0–100). ratio is only used as a suffix for names like disk_usage_ratio. The usual metric name follows the pattern A_per_B. |
| Voltage | volts | |
| Electric current | amperes | |
| Energy | joules | |
| Power | Prefer exporting a counter of joules, then rate(joules[5m]) gives you power in Watts. | |
| Mass | grams | grams is preferred over kilograms to avoid issues with the kilo prefix. |
Recording rules
复合 level:metric:operations 的命名规则:
- level代表聚合级别和标签
- metric代表指标名称,除了使用
rate()和irate()的时候应该保持不变 - operations代表的是操作列表,使用最新的操作
HISTOGRAMS AND SUMMARIES
| / | Histogram | Summary |
|---|---|---|
| 配置 | 选择适合观察值的预期范围的bucket | 选择所需的 φ 分位数和滑动窗口。 其他未选择的 φ 分位数和滑动窗口无法稍后计算。 |
| 客户端性能 | 由于只需要counters,所以不怎么消耗性能 | 计算流分位数非常消耗性能 |
| 服务器性能 | 需要服务器来计算q分位数,很消耗性能,但是可以使用recording rules来预计算 | 性能消耗小 |
| 时间序列数量 (除了 _sum 和 _count 序列) | 每一个bucket都有一个序列 | 每一个配置的分位数都有一个序列 |
| 分位数误差 (see below for details) | 选择合适的buckets | Error is limited in the dimension of φ by a configurable value. |
| φ分位数和滑动窗口定义 | 通过PromeQL定义 | 通过客户端定义 |
| 聚合 | 可通过PromeQL聚合 | 一般不可聚合 |
| 查询方式 | histogram_quantile(0.95, sum(rate(http_request_duration_seconds_bucket[5m])) by (le)) | http_request_duration_seconds_summary{quantile="0.95"} |
histogram_quantile 采用线性插值:
计算方式:分位值=起始bucket大小+(本bucket宽度)*(目标分位数在本bucket排行/本bucket记录数)
如果bucket选择合适,那么得到的分位数误差就较小。
1 | |

如何选择:
- 需要聚合选择
Histogram - 如果了解观测值的分布那么选择
Histogram;如果需要准确的分位数选择Summary
Grafana
Datasource
支持多种数据源,通过kube-prometheus安装的时候已经集成了Prometheus数据源。
1 | |
Dashboards
支持json导入,手动配置,配置文件配置,官方面板应用商城 id导入。
1 | |
Alert
告警配置跟随面板一起配置的:
- 触发频率;
- 触发条件;
- 没有数据或者出现异常如何处理;
- 通知内容和标签设置;
- 设置receiver;
本站所有文章除特别声明外,均采用 BY-NC-SA 4.0 许可协议。转载请注明出处!